
July 30, 2026
Clear Aligner Treatment Planning: A Step-by-Step Guide for Dental Professionals
From initial consultation to long-term retention—a complete guide to clear aligner treatment planning that helps you deliver better patient outcomes with confidence.


SoftSmile Team
Editorial Team


Clear aligners have moved from a cosmetic add-on to a core part of modern orthodontics. Patients want a nearly invisible way to straighten their teeth. Dentists want a workflow they can trust case after case. Digital treatment planning is what makes both possible.
This guide covers the full clinical path: patient assessment, digital diagnosis, virtual staging, aligner fabrication, clinical monitoring, and retention. Each stage builds on the one before it, and skipping a step costs time later.
Clear aligners handle a wide range of cases well, including mild to moderate crowding, spacing, overbite, underbite, and open bite. A recent study published in Nature confirms their growing role in everyday orthodontic care.
Below, you'll find the clinical detail behind each step, along with a look at how SoftSmile fits into clear aligner treatment planning — as the software that turns a diagnosis into a plan you can execute with confidence.
What Is Clear Aligner Treatment Planning?
Clear aligner treatment planning is the digital process of mapping tooth movement from start to finish. It defines where each tooth begins, where it needs to end up, and how many aligners the case requires to get there.
This plan decides the outcome before treatment even begins. A precise setup means predictable tooth movement, a realistic timeline, and a patient who trusts the process. A rushed or generic setup means poor tracking, extra refinements, and a longer road to the finish line.
Digital tools have taken over from the old manual methods. Intraoral scanners capture a full arch in minutes. CAD software builds the virtual setup. 3D printers produce the models, and thermoforming equipment shapes each tray around them.
None of this removes the dentist from the equation. Software proposes a plan; the clinician reviews it, adjusts it, and approves it before a single aligner goes into production. That final review is what keeps clear aligner orthodontic treatment safe and predictable.
The Clear Aligner Treatment Process: Step by Step
The path from consultation to retention follows a fixed order. Skip a step, and the whole case can drift off course. Here are the eight stages that make up the clear aligner treatment process.

1. Initial Consultation and Patient Assessment
The first appointment sets the foundation. Start with a full medical and dental history. Note any condition that could affect tooth movement — poorly controlled diabetes, active gum disease, or a history of slow healing. Record medications that affect bone turnover, such as bisphosphonates.
Next comes the clinical exam. It typically includes:
-
Panoramic or periapical X-rays to check root shape, bone structure, and unerupted teeth.
-
Intraoral digital scans to capture accurate tooth and tissue detail.
-
A standard photo set — frontal, profile, occlusal, and retracted views — for records and patient discussion.
Check gum health, bite relationships, and facial balance. Healthy tissue and adequate bone support come before any orthodontic work. If gum disease is active, treat and stabilize it first.
Expectations matter just as much as diagnostics. Explain clearly what aligners can and cannot fix. Show comparable cases, give an honest timeline, and name the limits up front. A direct conversation at this stage builds the trust that carries the case through.
2. Digital Diagnosis and Treatment Planning
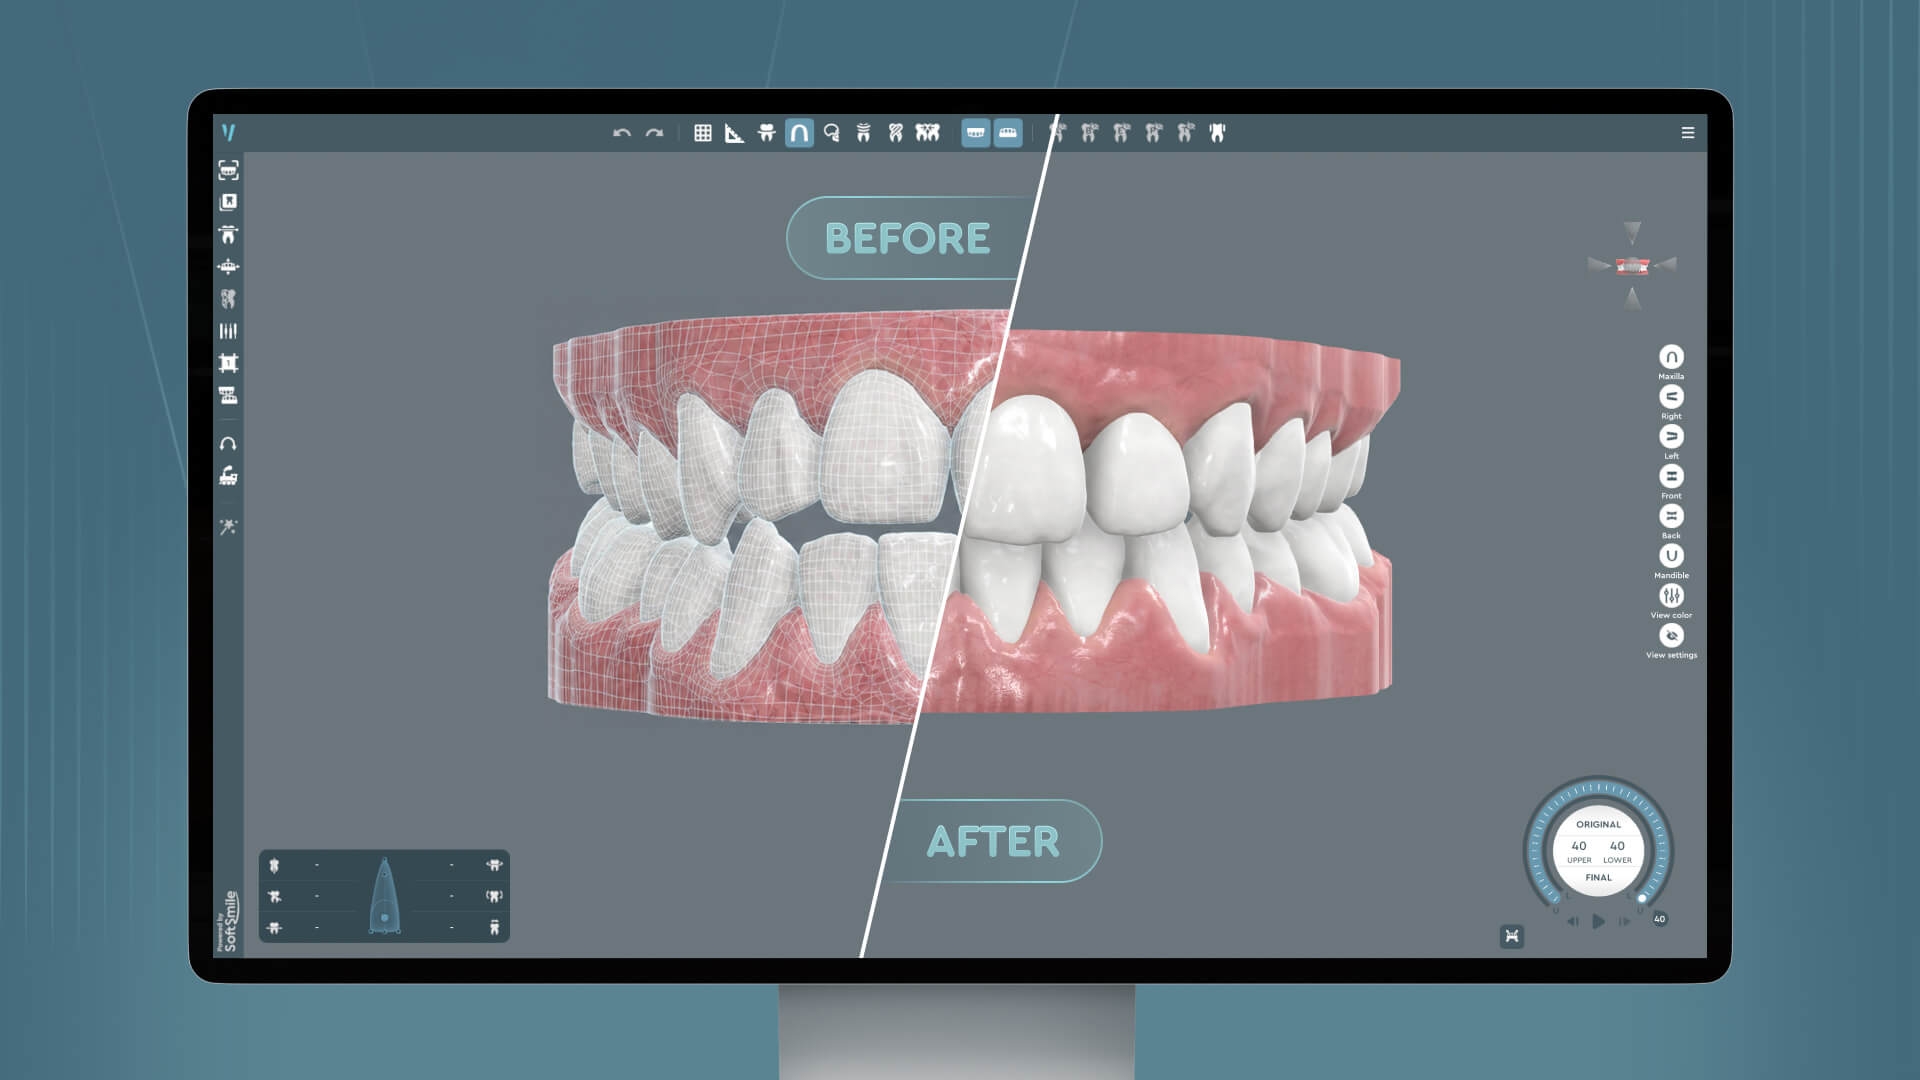
Once the records are in hand, the digital work begins. Load the scans, X-rays, and photos into your planning software. Most platforms merge this data into one 3D model of the patient's mouth.
From there, build a digital smile design and a full treatment simulation. This lets you preview the result before a single aligner exists. Set clear, measurable goals: align crowded teeth, close spacing, correct rotations, refine the bite.
Case selection matters here. Mild-to-moderate crowding, spaced arches, and narrow arches respond well to aligners. Larger rotations, significant vertical problems, or wide-open bites call for stronger biomechanical knowledge and sometimes added tools like interproximal reduction or temporary anchorage.
Consider CBCT imaging when root proximity or bone thickness is a concern. Root-informed planning adds a layer of safety, especially for larger movements or posterior work.
3. Virtual Aligner Setup and Staging
With goals in place, the software generates a virtual setup — an animation of every tooth moving from its starting point to its final position. Review each movement and adjust anything that looks biomechanically off.
Staging breaks the total movement into smaller steps. Each step matches one aligner, worn for one to two weeks. Bigger movements per stage shorten treatment but raise the risk of discomfort and tracking loss.
AI features can suggest a staging sequence and flag risk based on root position or bone density. These tools save time, but the final call belongs to the clinician, not the algorithm.
"Understanding biomechanics is the key to predictable results. Every tooth movement creates tension in the periodontal ligament, and it is important to control not only the crown but also the root. Effective planning requires a deep understanding of the aligner's action and reaction forces. We must anticipate exactly where the aligner engages the crown, how that translates clinically, and what biomechanical strategies are needed to counteract unwanted side effects.”

Build in checkpoints as you stage the case. They tell you when to schedule reviews and when attachments will do the most good.
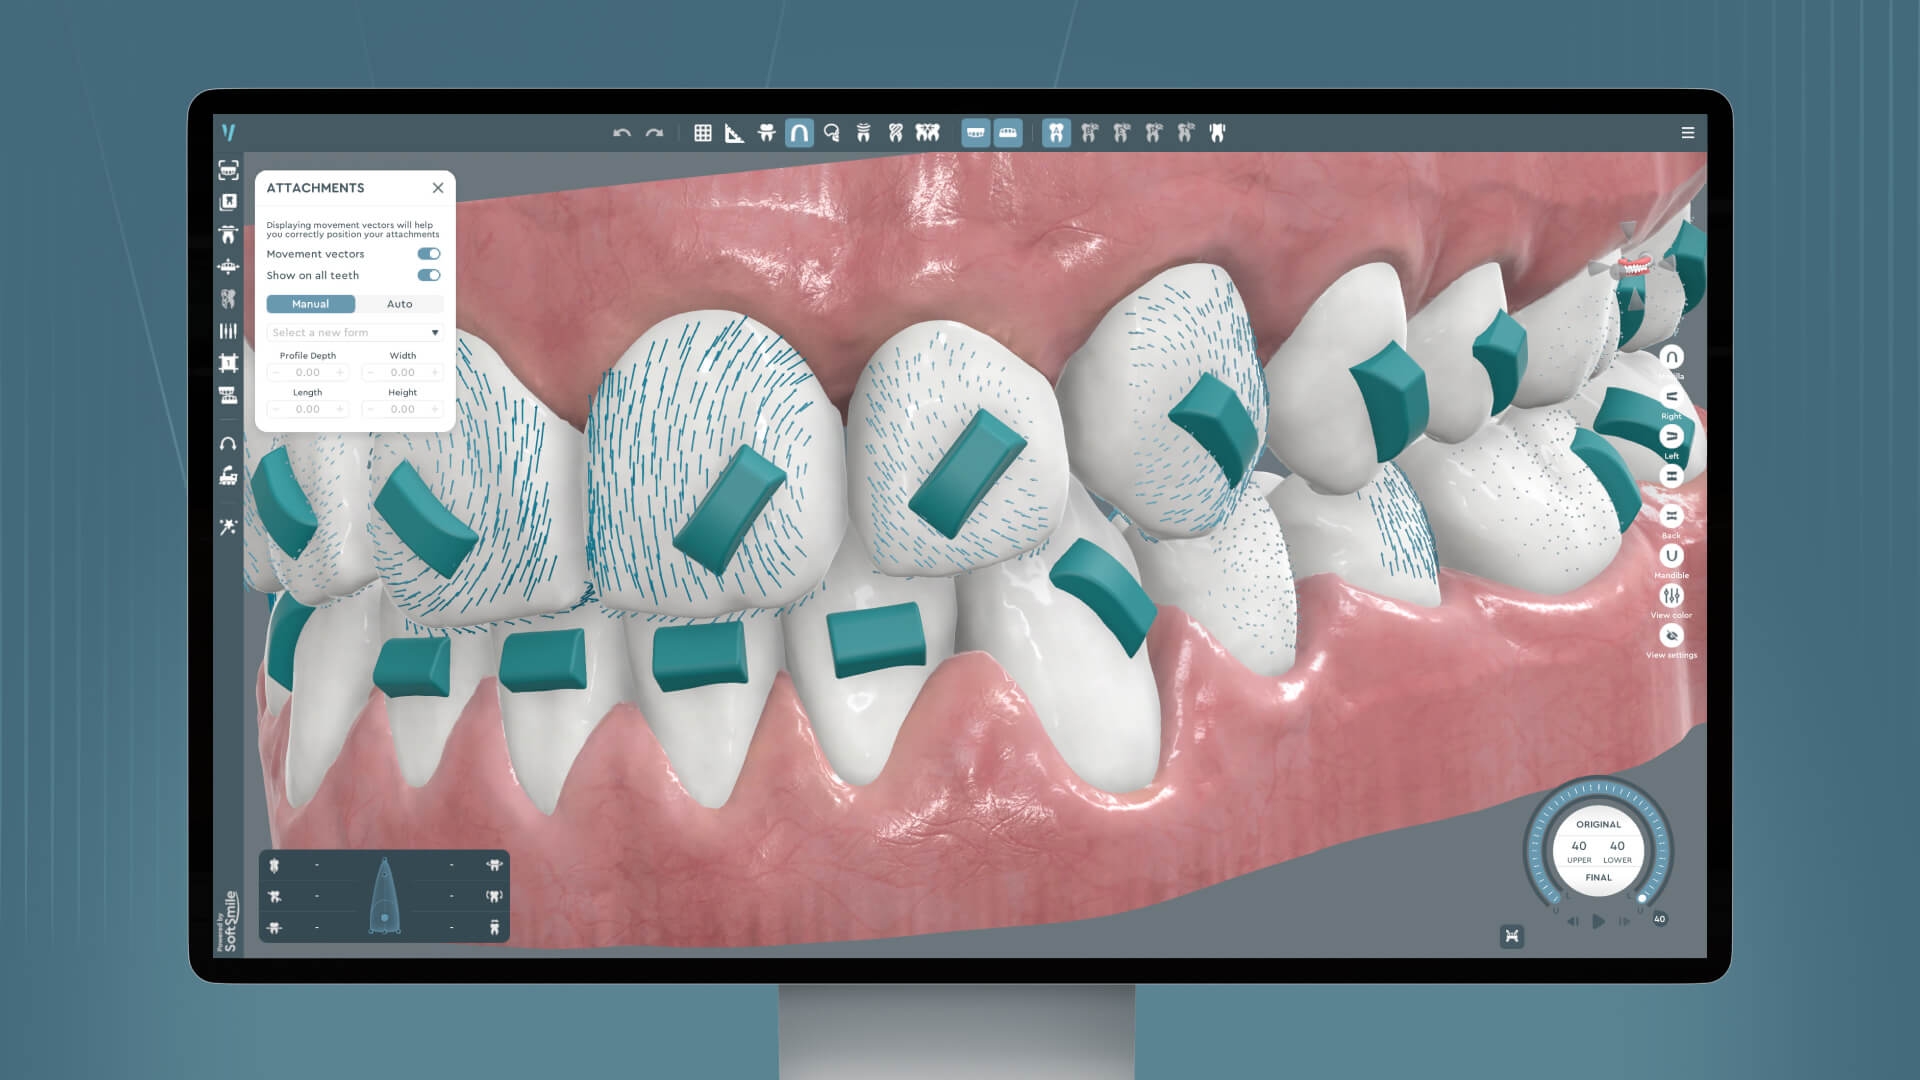
4. Incorporating Attachments and Auxiliary Features
Attachments are small, tooth-colored resin shapes bonded to select teeth. They give the aligner something to grip, so it can push or pull in a specific direction. Without them, rotations, extrusions, and intrusions rarely track well.
Placement is a skill in itself. Rectangular attachments work well for rotation. Beveled shapes help with extrusion. Good software lets you place each one virtually and preview how it interacts with the tray.
Other auxiliary tools round out the toolkit:
-
Elastics — correct front-to-back jaw discrepancies (Class II or III cases).
-
Bite ramps — open a deep bite by lifting the back teeth apart.
-
Interproximal reduction (IPR) — shaves a small amount of enamel between teeth to create space.
-
Temporary anchorage devices (TADs) — mini-implants that anchor harder movements, like molar distalization.
Modern platforms combine these features in one workspace, so you can place them, adjust them, and watch how they affect the final bite together.
5. Aligner Fabrication
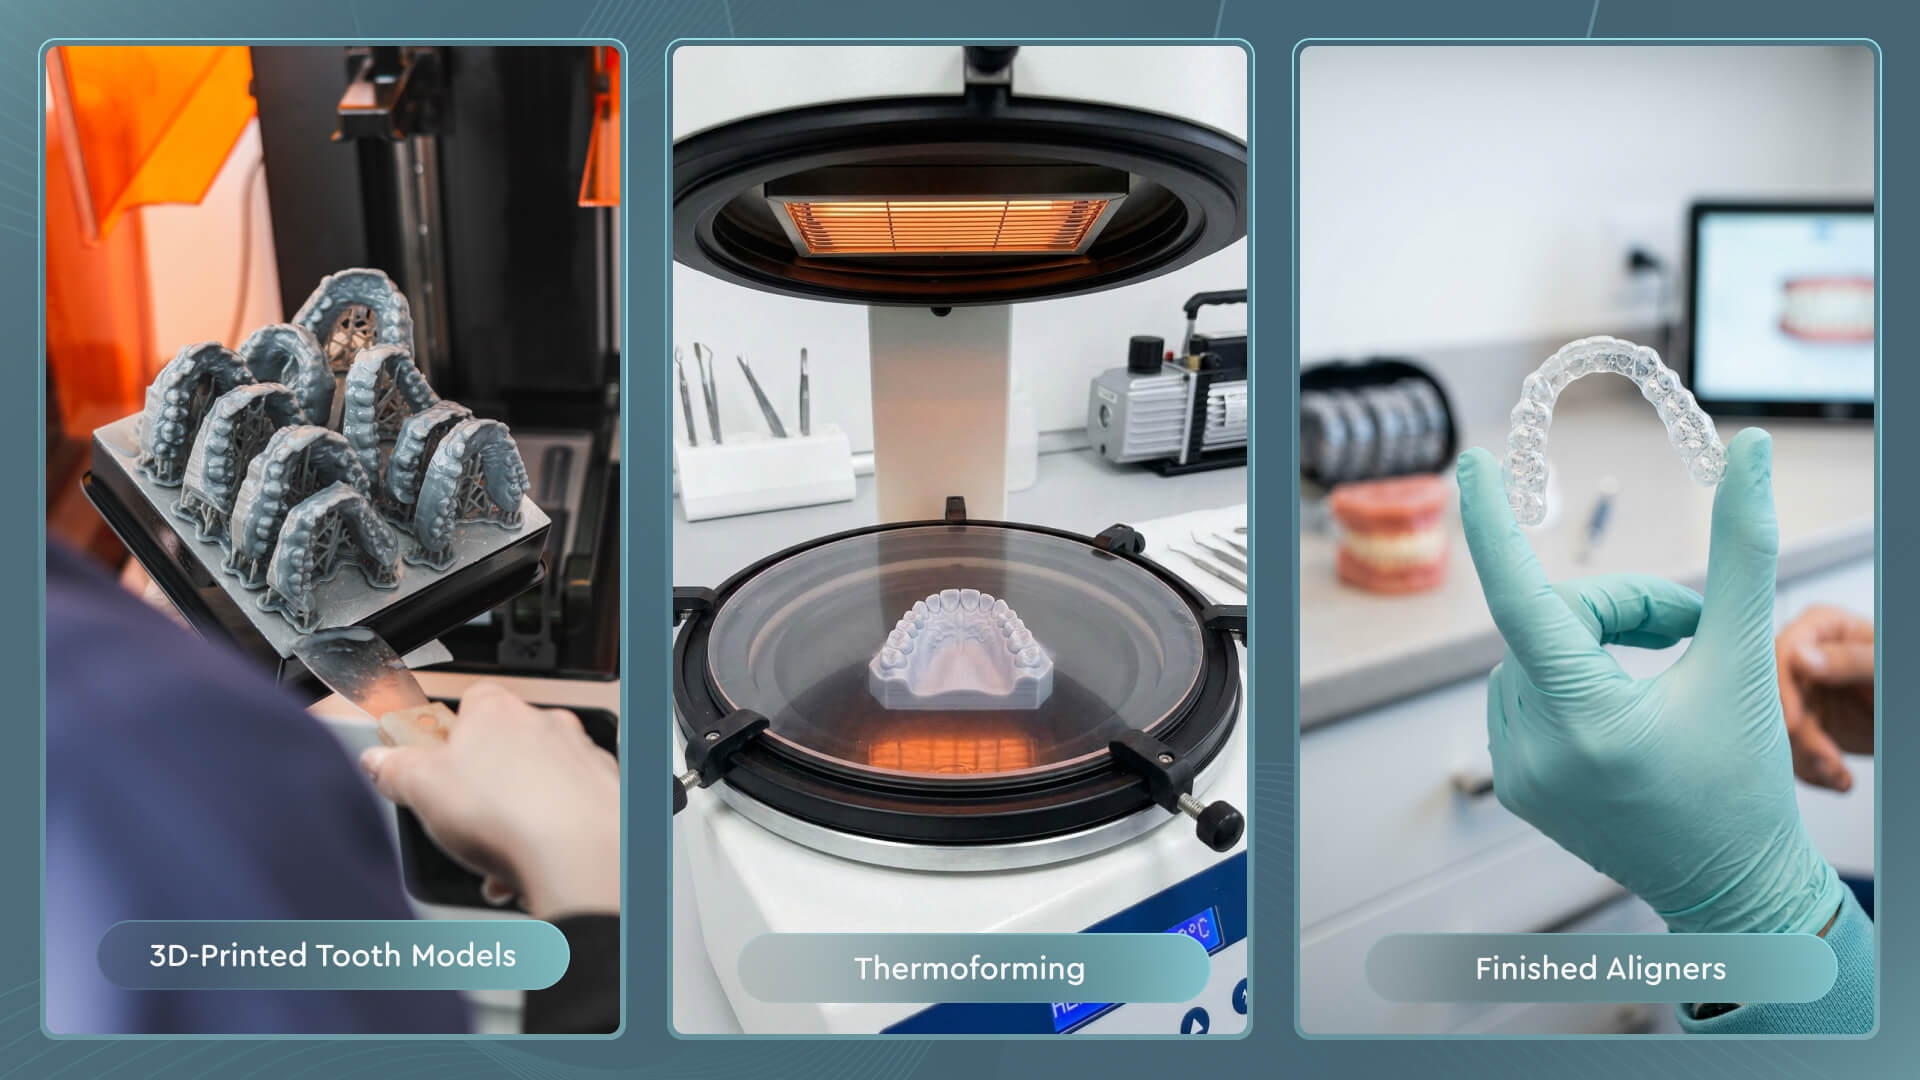
Once the plan is approved, fabrication starts. A 3D printer builds physical models straight from the digital setup. These models become the molds for each tray.
Thermoforming comes next. A sheet of medical-grade plastic — usually PETG — heats up until pliable, then forms over the model under vacuum or pressure. Positive-pressure forming holds tighter tolerances and gives a more even, consistent fit than standard vacuum forming.
After forming, each tray gets trimmed, polished, and checked for accuracy and thickness. Some labs add an optical scan to confirm the tray matches the digital file exactly.
SoftSmile gives you a choice here. With SoftSmile VISION, you can export STL files and produce trays in-house, or hand the job to SoftSmile's production service. In-house keeps turnaround in your hands; outsourcing cuts your lab overhead. Either way, you end up with a set of precise, ready-to-fit trays. Read more in our guide to 3D-printed aligners.
6. Patient Fitting and Daily Wear
Delivery day makes the plan real. Check that the first tray seats fully, without gaps. Walk the patient through insertion and removal so they don't damage the aligners at home.
Set the wear target clearly: 20 to 22 hours a day. The only exceptions are eating, drinking anything besides water, and brushing. Skipping this — even for meals out or long social events — pushes the whole schedule back.
Most patients wear each set for one to two weeks before moving to the next. Some clinicians shorten this window early in treatment and extend it later, depending on how the case tracks.
A little pressure, mild soreness, and a brief lisp are normal for the first few days. Reassure the patient and suggest over-the-counter pain relief if needed.
Compliance decides more than any other factor. A flawless plan fails if the trays stay in a drawer. Walk patients through what happens without consistent wear — longer treatment, more refinements, weaker results. Showing them the digital timeline helps the message land.
7. Monitoring Progress and Mid-Course Corrections
Follow-up visits every six to eight weeks keep a case on track. Check the current tray's fit, compare tooth position against the plan, and review gum health and hygiene.
If a tooth isn't moving as planned, step in early. That might mean a new scan and a refinement series, a change in attachment position, or an added auxiliary force. Catching drift early is far easier than fixing it after several stages have failed.
Remote monitoring is growing common. Smartphone scans or home devices let patients send progress photos between visits, cutting chair time and surfacing problems sooner.
Use a short checklist at each review:
-
Is the current tray fully seated?
-
Is each tooth tracking as predicted?
-
Does the patient report pain or difficulty?
-
Is compliance holding steady?
Log every observation. Refinements aren't a sign of failure — they're a normal part of aligner therapy, and many plans account for them from day one.
8. Completion and Retention Phase
The final review compares the result against the original digital setup. Are the teeth where they should be? Is the bite stable and functional? A "yes" here means the active phase is done — but the case isn't finished yet.
Retention comes next, and it's not optional. Teeth drift back toward their original position over time. A retainer holds the result in place.
Two main options exist:
-
Removable retainers — clear trays or wire-and-acrylic designs. Easy to clean, worn full-time at first, then nights only.
-
Fixed retainers — thin wire bonded behind the front teeth. Invisible and compliance-free, but harder to floss around.
Many clinicians combine both: a fixed retainer on the lower front teeth, a removable one on top. Retention should last at least as long as active treatment, and indefinite nighttime wear is common advice.
Make sure patients understand that retention protects years of work. Regular checks every six to twelve months catch fit issues before they become relapse.
The Role of Digital Technology in Treatment Planning
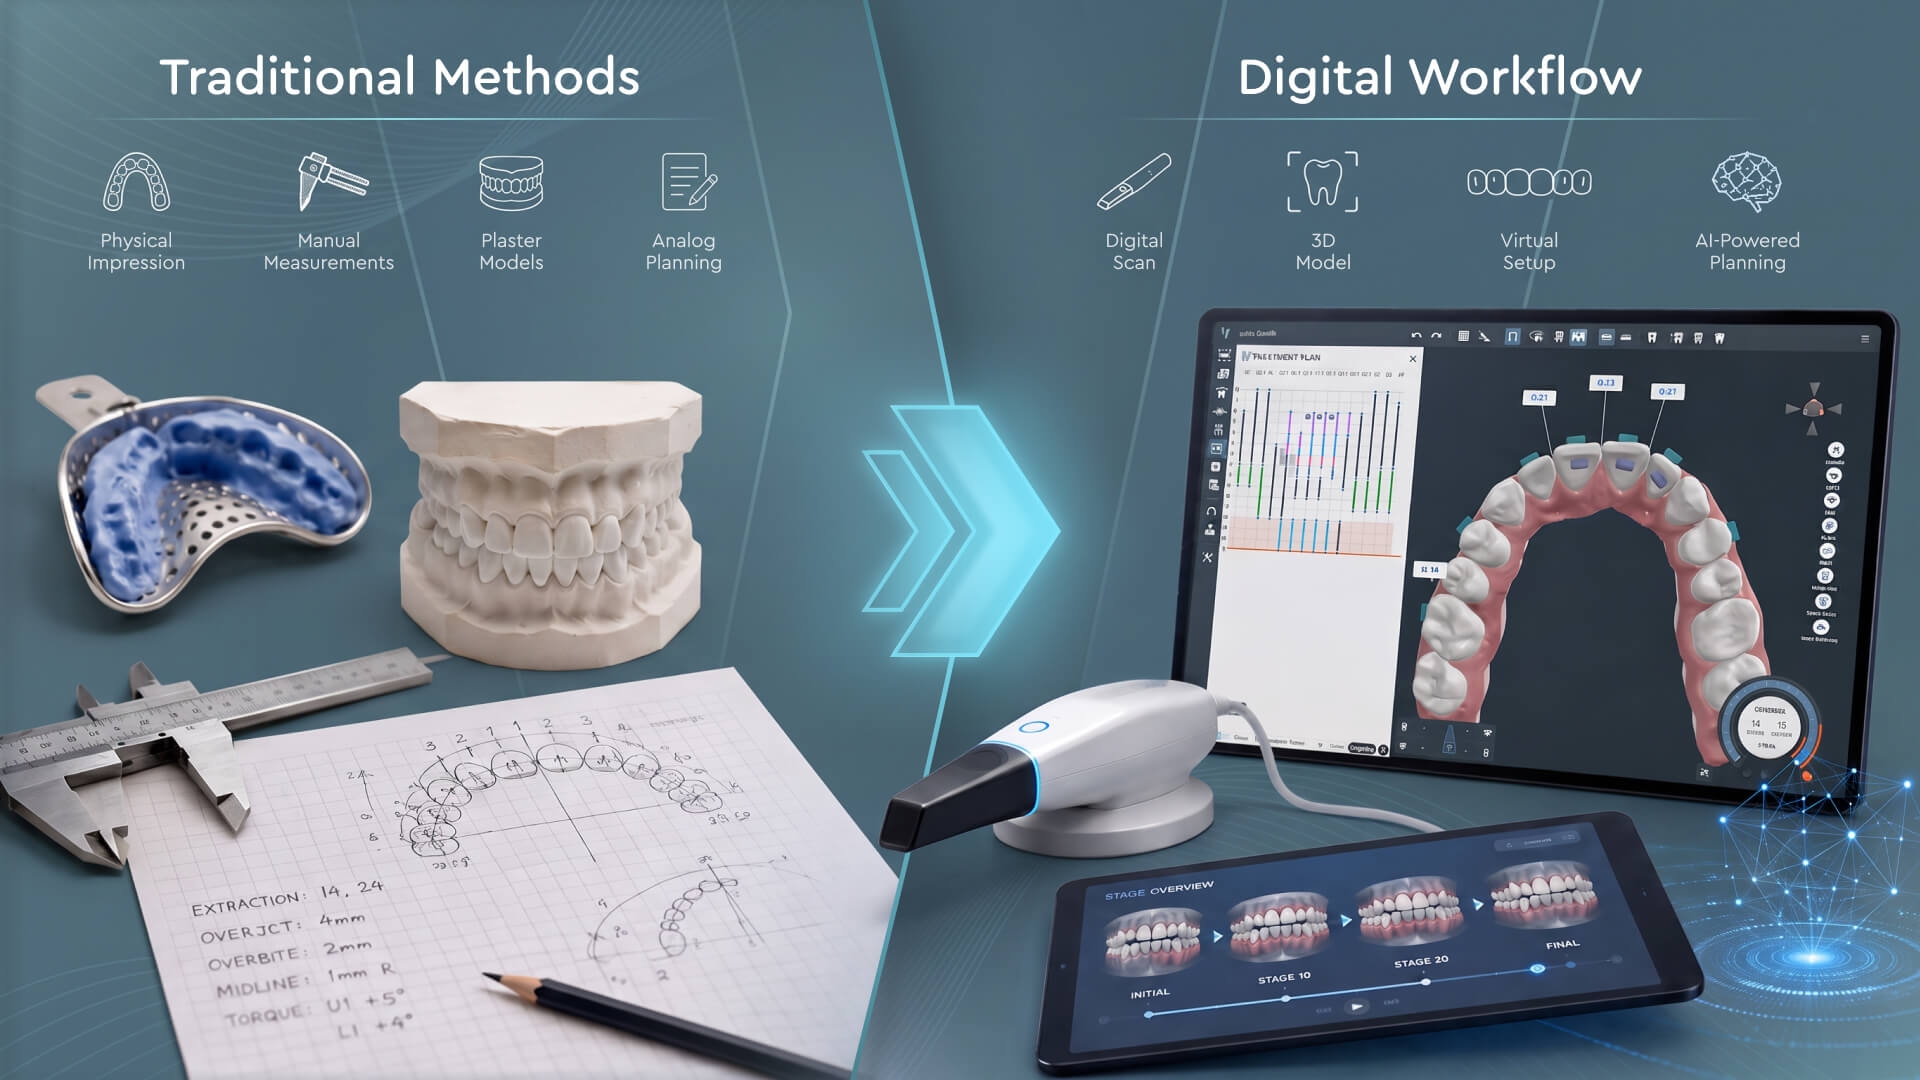
Digital tools have changed what orthodontic clear aligner treatment can achieve. They tighten accuracy at every stage and cut down on guesswork.
Intraoral scanners lead that change. They replace messy impressions with a high-resolution digital model captured in minutes. Patients sit through less discomfort, and clinicians work from cleaner data.
Treatment planning software takes it from there. It simulates every tooth movement in detail before anything gets manufactured, so you can test and adjust the plan on screen instead of in the patient's mouth.
Artificial intelligence adds real speed. Automated segmentation, staging suggestions, and attachment placement all run through AI models now. In some workflows, this cuts planning time by up to 95%.
The gains reach past the treatment chair. Digital records travel faster between the practice and the lab, turnaround shrinks, and a growing caseload no longer means a growing backlog.
SoftSmile sits at the center of this shift. VISION offers a full, clear view of the treatment plan while keeping clinical control in your hands. It's FDA-cleared and built by doctors, for doctors. For a broader comparison, see our guide to orthodontic software.
Common Mistakes in Clear Aligner Treatment Planning and How to Avoid Them
Even experienced clinicians run into the same handful of pitfalls. Catching them early protects both outcomes and reputation.
-
Poor case selection. Taking on a complex case without the biomechanical background to back it up sets the case up to fail. Match difficulty to experience, and refer out when it makes sense.
-
Underusing attachments. Skipping attachments on a case that needs controlled movement almost guarantees poor tracking. Plan auxiliaries as part of the setup, not as a fix after the fact.
-
Inadequate monitoring. Missed check-ups let small tracking issues turn into big ones. A consistent review schedule catches problems while they're still easy to correct.
-
Unrealistic goals. Overpromising results or planning movement beyond what the biology allows damages trust fast. Set targets patients can actually reach, and say so plainly.
-
Blind reliance on technician setups. Approving a setup without a real clinical review hands control to someone who isn't in the room with the patient. Review and sign off on every plan yourself.
Avoiding these comes down to discipline: choose software that keeps you in control, run thorough diagnostics, monitor consistently, and keep reinforcing compliance with patients.
How SoftSmile Empowers Clear Aligner Treatment Planning
SoftSmile brings together three pieces that work as one system: VISION software, in-house aligner production, and an expert team that checks every set before it ships.
VISION sits at the core. It gives you full clinical control from the first scan to the last stage, with:
-
AI-assisted staging that speeds up planning without taking over the decision.
-
Automated segmentation that isolates each tooth in seconds.
-
CBCT integration for root-informed, safer movement planning.
Production runs inside the same ecosystem. Plan a case in VISION, then send it straight to manufacturing without switching platforms. A dedicated team reviews each set before it moves forward, adding a second layer of quality control.
The result: shorter planning time, tighter precision, and full ownership of the case from diagnosis to delivery. You stay the decision-maker — the software just gives you better tools to work with.
Key Considerations for Choosing a Treatment Planning Software
The platform you pick shapes your daily workflow for years. Weigh these factors before committing to any clear aligner treatment planning software.
-
Clinical control. The final plan needs your approval, not a technician's sign-off by default.
-
Automation that helps, not hides. Automated segmentation, staging suggestions, and attachment placement should save time without removing your say in the outcome.
-
Integration. Check compatibility with your scanner, CBCT system, and practice management software before you commit.
-
User experience. A clear interface shortens the learning curve for you and your team.
-
Range of use. The platform should handle a simple spacing case and a demanding malocclusion with equal reliability.
-
Support and training. Good onboarding turns a capable tool into one your team actually uses well.
-
Cost structure. Compare subscription pricing against per-case fees, and pick what fits your practice volume.
Frequently Asked Questions About Clear Aligner Treatment
How long does clear aligner treatment typically last? Most cases run six to eighteen months. Clear aligner treatment duration depends on case complexity, how consistently the patient wears the trays, and how much movement the plan calls for.
Are clear aligners suitable for complex cases? Many complex cases respond well with sound biomechanical planning and well-placed attachments. Severe malocclusions still call for caution, and some need fixed appliances or a combined approach.
What happens if an aligner is lost or damaged? Contact your clinician right away. In many cases, you'll be told to wear the previous set to hold your progress until a replacement is ready. Don't jump ahead to the next stage on your own.
What is the role of attachments? Attachments are small, tooth-colored aids bonded to the teeth. They give the aligner a grip point so it can apply targeted pressure — the piece that makes rotations and extrusions predictable.
What is the retention phase, and why does it matter? Retention means wearing a retainer after active treatment ends. It holds teeth in their new position and prevents relapse. Skip it, and teeth can drift back toward where they started.
How much does clear aligner treatment cost? In the U.S., clear aligner treatment typically costs $3,000–$8,000, with a national average around $5,000 as of mid-2026. Case complexity, provider expertise, and location all move the price within that range — simple cases sit at the lower end, more involved treatment costs more. A precise digital plan helps control cost by reducing the need for refinements and remakes.


Sign up for our newsletter!
Case Studies, Podcasts, Ebooks, Events, Webinars, Company news, and more...
By subscribing you agree to the Terms of Use and Privacy Policy.


